Link Defects or Bugs on List View Execution Screen
You may come across defects/bugs while running the test. These defects need to be recorded properly for further analysis. You can log defects for test steps and test cases individually. You can either create a new defect or link an existing defect to the test case/test step. Bugs added to steps are also reflected at the test case level.
If the Auto link bug(s) that are found during execution to the story option in Space Settings is enabled and the test case is associated with a Jira Story, then the bug linked during execution will also get linked to the story. Refer to Auto-link Execution Bugs to Stories for more information.
Link Defects or Bugs to a Test Case
You can link bugs to test cases/test steps while executing the test.
Perform the following steps to link defects to a test case:
Navigate to the test execution screen. If bugs are already linked to the test case or test steps, you can view the bug count.
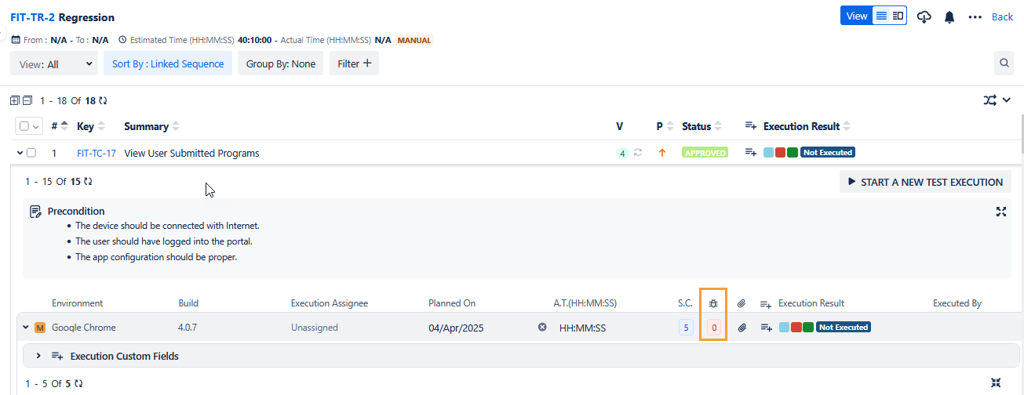
To link a bug to the test case, click on the count under the Bug column for the test case. The count could be zero if there is not a single bug linked to the test case or the test steps under that test case.
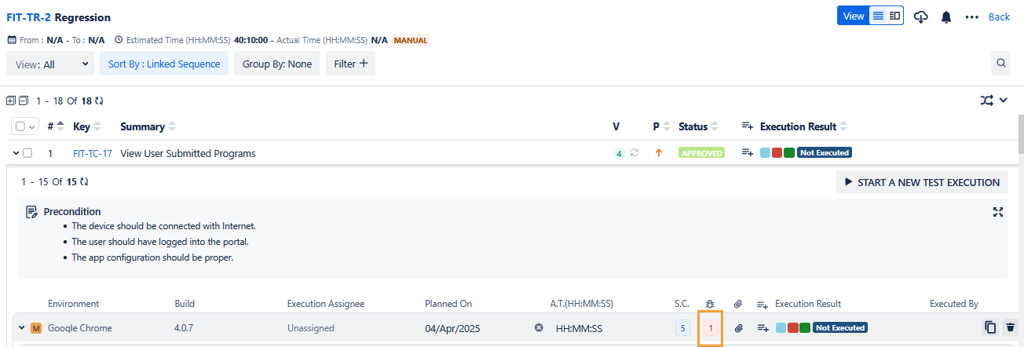
By clicking on the bug count, the Assign Bugs screen opens.
You can either add an existing bug or create a new bug to link to the test case.
Link Existing Bug
Perform the following steps to link an existing bug:
Click on the Link existing Bug button. The Link Existing Bug to Execution dialog box opens. The screen displays the records as per the Work Type enabled for Bug in Auto-link Execution Bugs to Stories .
Select the bug you want to link with the test case and click either of the following buttons:
Link: You can link existing bugs to the test execution. Select the bugs that you want to link with the test execution and click on the Link button. Once the bugs are linked, the Link Existing Bug to Execution dialog box still remains open to let you link other bugs.
Link & Close: You can link bugs and close the dialog box. Select the bugs that you want to link with the test execution and click on the Link & Close button.
You can also -
(A) Select bugs logged in other spaces. Click the space drop-down list and select other spaces from which you want to add the bug.
(B) Apply the Basic filter to search bugs (The Work Type filter displays Work Type in accordance with the Work Type enabled for Bugs in Enable QMetry Features for Jira Project.)
Note
A maximum of ten filters, including system as well as custom fields, can be selected at a time.
(C) apply JQL to search bugs.

Switch to JQL: Click the Switch to JQL. The JQL editor is visible. Write the query to filter the records.
Creating a Bug
Perform the following steps to create a bug:
Click the Create Bug button. The Create Work screen of Jira opens. The Work Type drop-down shows the list of work types as per the Work Type enabled for Bug in Enable Work Types for Story and Bug . By default "Bug" work type is auto-selected on the drop-down.
Create a work with work Type "Bug".
The bug created from the Execution Screen is linked to the test case directly.
Link Bugs to Multiple Test Cases
The bulk operation feature allows you to link multiple bugs to the latest test case executions in a single action. You can also create a new bug or subtask and link it to multiple test case executions in a single action.
Note
You need the Test Cycle Manage Defect permission to link bugs in bulk to multiple test case executions at once.
Note
Bugs are linked to the latest test executions.
If a bug is already linked to the test case execution level, the system skips the linkage.
If a bug is already linked at the test case step level, the system links it to the test case execution.
Link Existing Bugs to Multiple Test Cases
To link existing bugs to multiple test cases at a time, perform the following steps:
Select the test cases to which you want to link bugs.
Click the Bulk Operations option.
Click the Link Bugs submenu, and select Link Existing Bug.
The Link Existing Bug to Execution dialog box appears.
Select the bugs to link to the test cases, and then click Link.
Note
You can link a maximum of five bugs at a time.
The bugs are linked to the selected test cases.
The Bug section for the test case displays the linked bugs.
Create and Link a Bug to Multiple Test Cases
When you create or link a bug for the first time, QMetry Test Management for Jira populates the Steps to Reproduce section of the bug with the details of the first test case linked in the sequence. These details remain unchanged when you link the bug to other test cases later.
To create and link new bugs to multiple test cases at a time, perform the following steps:
Select the test cases you want to link bugs to.
Click the Bulk Operations option.
Click the Link Bugs submenu, and then select Create Bug.
The Create Issue screen appears.
Enter the bug details in Jira, and then click Create.
The new bug is linked to the selected test cases.
View Execution Logs
To view execution logs for bug-linking operations, perform the following steps:
Click the Actions icon.
Select View Execution Logs.
The Execution Logs pane displays the logs for linking bugs to test cases.
Link Defects or Bugs to Test Step
Apart from linking defects to the test case, you can also link defects to test steps to trace the bug related to the step level.
Perform the following steps to link defects to test steps:
Select the Steps tab by clicking on the Step Count (S.C.) for the test case.
Click on the bug icon at the right.
The Assign Bugs screen opens. Follow the same steps described above to create a new bug or add existing bugs.
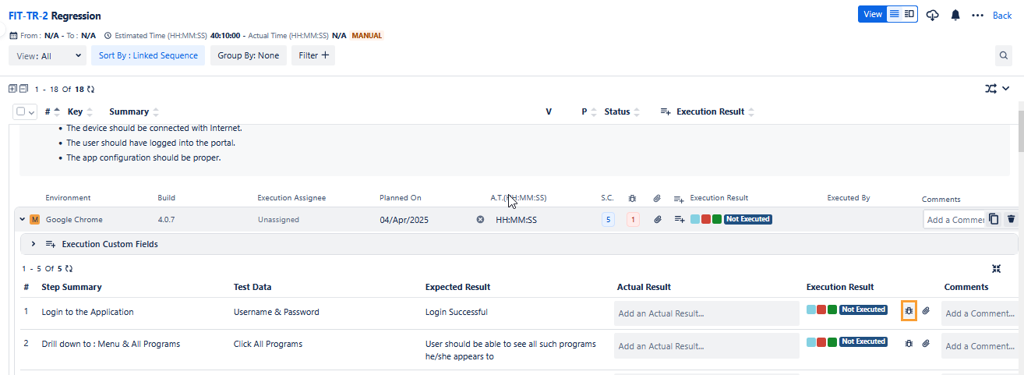
The color of the Bug icon changes(Red) as soon as you associate a bug with it.
Unlink Defects/Bugs
Defects/Bugs are linked with the test case and test step from the execution screen. You can delete attachments in accordance with their level - test case/test step.
Bug Level | Bugs can be unlinked from - |
|---|---|
Test Case Execution | Test Case |
Test Step Execution at sequence number 1 | Test Step |
Unlink a Single Bug
Perform the following steps to unlink a single bug:
Hover the mouse over the bug that you want to unlink.
The Unlink icon becomes visible.
Click the unlink icon to remove the association of the bug with the test case.
Unlinking Multiple Bugs at a time
Perform the following steps to unlink multiple bugs:
Select the bugs you want to unlink.
Click the Bulk Unlink button.